
Life isn't always black and white, a Mixed Media Portrait

How quickly an idea can change. I have an art journal full of unused Gelli prints and some basic supplies that have been calling my name, so when I get 5 minutes to unwind I use what's in front of me to do something wild and crazy.

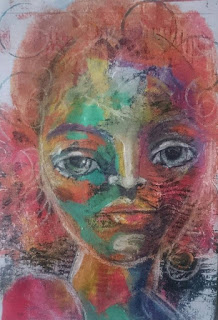
Today I grabbed some cheap chalk pastels and just started to play. As I get to the hair you will see that the pastels are a little weak in value and saturation so I sprayed with a fixative added some sewing tissue and paper to cover the red pastel and turned her hair green. I added some contrast in the background and pumped up the color with little touches of acrylic and oil pencil. Don't be afraid to layer and think outside the box. Use crazy colors, don't be a perfectionist, use items that are completely out of your comfort zone. Grow. This painting is one of those ideas that went off the rails and turned out pretty good. It has all the characteristics I personally look for in my art. Value, Composition, Contrast, and Interest. Hope this inspires you and remember sharing is caring.

 
Life Isn't Always Black and White
5 * 8 inch
Mixed Media on paper (acrylic, pastel, ink, oil pastel, oil pencil)

Comments

Popular posts from this blog

DIY Crayon costume for Halloween

Halloween is my favorite time of year. We spend weeks getting our yard and home decorated all for the night when the little ghosts and goblins come out to play. ;) B started school this year and within her school, they don't do a Halloween per say, they have an orange and black day. So in order to kill 2 birds with one stone, we decided that she is going to be an orange crayon. So with an old t-shirt and a little black felt fabric, this is what I came up with. I think it turned out Awesome! And the best part is that it was a no-sew project. Supplies needed:  1 t-shirt in the size required. 1 box of orange fabric dye (because they didn't' have any orange t-shirts in her size) 1 wooden spoon 1 large container for dying remnant black fabric. I used black felt because that is what I had on hand. 1 pattern for the Crayola font - I used this one Crayola pattern  and made the size adjustments accordingly when I was printing it out. For the crayon label banding, I just wi

Halloween Haunt - DIY Rotting Flesh/ Corpsing prop tutorial

Here is one of the techniques I use to attain the rotting flesh look on cheap plastic dollar store Halloween props.  Supplies you will need: plastic body parts or skeletons cheap plastic wrap - it doesn't matter what brand  heat gun or high-temperature hairdryer wood stain ( I used oak because that is what I had laying around) spray paint ( red and black) craft paint (red, black, dark brown, white, grey and green)   First, wrap your cheap skulls or bones in a few layers of plastic food wrap. It doesn't matter what brand. Then take your heat gun and melt areas away until you get your desired look. Some hairdryers may not be able to get hot enough to do this. Then take your wood stain and start adding a little colour.  Color choices are completely up to you but i used red, flesh, dark brown, black, white, grey. On the skull, I added some black spray paint in the hallows of the eyes to add a little more dimension.  Hope this inspires you to try a new prop id

Sailboat at sunset watercolor painting tutorial

Just a quick demo on how I painted this sailboat at sunset. Colors used: Indian Yellow, Napthol Red, Alizarin Crimson, Royal Blue, Burnt Sienna and Brillant Orange and permenant ink First draw out your image and mask off your sun spot - dry. I chose to use ink as a base to this painting applying it both directly and using it as a wash to add some shadows. Next wet the entire sky area. Working around your sun spot start by adding a graduated wash of indian yellow from the bottom to about 3/4 the way up, then add in alizarin crimson, and at the top work in a band of royal blue letting it run down a little. DRY The sky is not holding the weight I need it to so I wen over it again using the same colors and technique. This time adding a band of brilliant orange along the bottom. Looking better but still not quite there. So lets dry and move on to another area so that I can come back and judge the values. The sails were added using a mix of BS, brilliant orange and indian yellow. D