Hi everyone. Well summer is quickly moving in in this neck of the woods so I have been busy digging my garden beds and planting some vedgies. I already have onions, radishes, spinach, carrots and beets coming up. :) As well I have been busy with getting 3 back to back commission pieces - in pencil. Kinda funny since I usually work in watercolors. hmmm. Thinking maybe I should rethink my focus. LOL Anyways this is my latest. It is a picture of "Lad" a border collie with a wonderful story behind him. In the reference picture one of Lad's eyes was closed - so I opened it up and added a stick in the foreground - I guess he is a fetcher. :) Working with black fur is not easy. Even though it looks black there are 3-4 values within those darks. 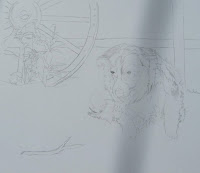
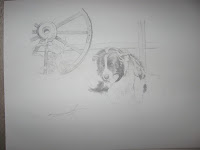
 Good morning. :) So in this installment the fur is starting to "fluff" up and you can start to see the many shadows involved in the underside of the puppy. Also the woodwork is starting to get some texture in it. I am also going to be going back in and adjust his eyes a bit they seem to be a little harsh right now. So far I have only used f, h, hb mech and 2b mech. In the next installment I am going to be popping in some deep darks probably with my 6b. (This would be a good time for me to find my handy value scale to see exactly how dark I can go.)
I dont know if this piece is more a work of pencils or erasers.

It was all about the woodwork yesterday, focusing most of my attention on the wagon wheel and the fence posts. I can see the light at the end of the tunnel now, a little work to do on softening lad's fur and adding a little spotty grass to fill in some of the empty space but it is really starting to sing now. :)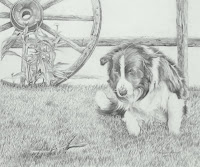
9 * 11.75
Graphite on #300 series Bristol
Got a little carried away with the grass got into the zone and one blade turned into 2 and... well you know. ;) But I dont think it is overworked - it just adds another texture into this drawing. Hope you enjoy!


 Good morning. :) So in this installment the fur is starting to "fluff" up and you can start to see the many shadows involved in the underside of the puppy. Also the woodwork is starting to get some texture in it. I am also going to be going back in and adjust his eyes a bit they seem to be a little harsh right now. So far I have only used f, h, hb mech and 2b mech. In the next installment I am going to be popping in some deep darks probably with my 6b. (This would be a good time for me to find my handy value scale to see exactly how dark I can go.)
 I dont know if this piece is more a work of pencils or erasers.


It was all about the woodwork yesterday, focusing most of my attention on the wagon wheel and the fence posts. I can see the light at the end of the tunnel now, a little work to do on softening lad's fur and adding a little spotty grass to fill in some of the empty space but it is really starting to sing now. :)

9 * 11.75
Graphite on #300 series Bristol
Got a little carried away with the grass got into the zone and one blade turned into 2 and... well you know. ;) But I dont think it is overworked - it just adds another texture into this drawing. Hope you enjoy!
Comments
Post a Comment